How to configure marker table columns
Validate has a predefined set of columns that make up the marker table.
In this guide we'll go through how these columns can be configured through both settings and user preferences.
Display a simple field
We'll start by adding a simple field. Let's reuse the configuration we described in the custom forms guide where we added a simple field to the default marker form.
First define the form:
{
  "forms": {
    "defaultMarker": {
      "schema": {
        "type": "object",
        "properties": {
          "exampleField": {
            "type": "string"
          }
        }
      },
      "uischema": {
        "type": "VerticalLayout",
        "elements": [
          {
            "type": "Control",
            "label": "Example data",
            "scope": "#/properties/exampleField"
          }
        ]
      }
    }
  }
}
Then add a marker with matching metadata:
{
  "metadata": [
    {
      "key": "exampleField",
      "value": "Test marker"
    }
  ],
  "start": {
    "frame": 200,
    "numerator": 24,
    "denominator": 1
  },
  "end": {
    "frame": 350,
    "numerator": 24,
    "denominator": 1
  }
}
At this point, our field is displayed in the marker form, but it's not visible in the marker table. Let's fix that!
We define the table columns using the markerTableDefinitions setting:
{
  "markerTableDefinitions": [
    {
      "id": "exampleField",
      "label": "Example Field",
      "enabled": true,
      "scope": "#/metadata/exampleField",
      "format": "STRING"
    },
    {
      "id": "start",
      "label": "Start",
      "enabled": true,
      "scope": "#/start",
      "format": "TIMECODE"
    },
    {
      "id": "end",
      "label": "End",
      "enabled": true,
      "scope": "#/end",
      "format": "TIMECODE"
    },
    {
      "id": "duration",
      "label": "Duration",
      "enabled": true,
      "scope": "#/duration",
      "format": "TIMECODE"
    },
    {
      "id": "group",
      "label": "Group",
      "enabled": true,
      "scope": "#/group",
      "format": "STRING"
    },
    {
      "id": "track",
      "label": "Track",
      "enabled": true,
      "scope": "#/track",
      "format": "STRING"
    }
  ]
}
The scope "#/metadata/exampleField" tells the application to extract data from the marker metadata entry with the key exampleField.
When configuring markerTableDefinitions you need to define all the columns you want to use.
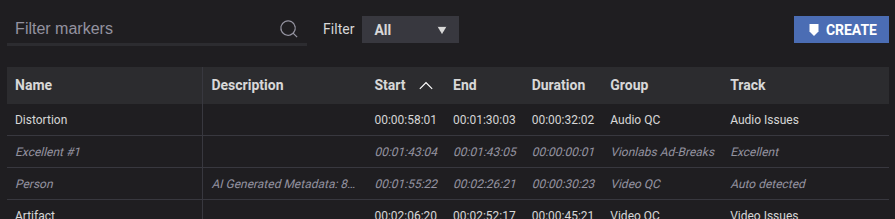
With that setting in place, the column appears in the marker table.
Multiple scopes and mapped values
Let's look at a more advanced example.
We'll create markers that have videoStatus and/or audioStatus metadata fields. The statuses are represented by integers.
-
Our first goal is to have a single column that shows the
videoStatus, but falls back to theaudioStatusif thevideoStatusdoes not exist. -
Our second goal is to make the status more readable than just an integer.
Let's start with some markers:
[
  {
    "metadata": [
      {
        "key": "videoStatus",
        "value": "1"
      },
      {
        "key": "audioStatus",
        "value": "2"
      }
    ],
    "start": {
      "frame": 200,
      "numerator": 24,
      "denominator": 1
    },
    "end": {
      "frame": 350,
      "numerator": 24,
      "denominator": 1
    }
  },
  {
    "metadata": [
      {
        "key": "audioStatus",
        "value": "2"
      }
    ],
    "start": {
      "frame": 1300,
      "numerator": 24,
      "denominator": 1
    },
    "end": {
      "frame": 1399,
      "numerator": 24,
      "denominator": 1
    }
  }
]
And we'll use this markerTableDefinition:
{
  "id": "status",
  "label": "Status",
  "enabled": true,
  "scope": ["#/metadata/videoStatus", "#/metadata/audioStatus"],
  "format": "STRING",
  "valueMapper": {
    "1" : "In progress",
    "2" : "Approved",
    "3" : "Rejected"
  }
}
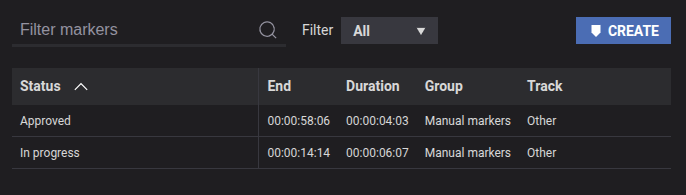
This scope will look for the videoStatus field first, and fall back to the audioStatus field.
The valueMapper will map the statuses to a more readable format.
This is what the resulting table looks like:
Using user preferences
In some cases, users may want to personalize their marker table, reordering or even hide different columns. It's possible to do this through user preferences.
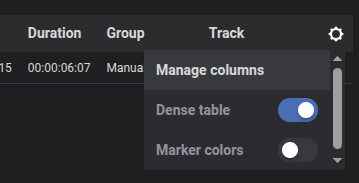
When you hover the marker table header, a cog wheel appears in the top right corner. Click on the cog wheel and select "Manage columns".
Here you can reorder the columns and select which ones should be visible.
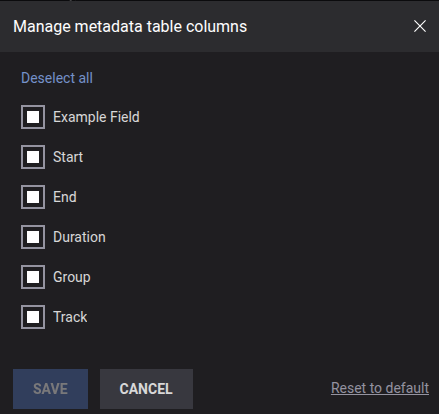
Your changes are stored in your browser and will be applied every time you start Validate.