How to play content using JIT
JIT (Just-In-Time) playback makes it possible to play video formats that would otherwise require transcoding before being playable in a web browser.
Step 1: Set up a JIT backend
Playing files with Accurate Player JIT requires a JIT Backend. You can read more about how to set the backend up in this tutorial. The tutorial also includes an example frontend application, but we are only interested in the backend section.
Step 2: Configure video- and audio files
JIT may play video files from a URL or a local file. In the latter case, the file has to be accessible on the host machine running the backend, and will be mounted into the container upon start.
{
  "type": "VIDEO",
  "url": "https://jit-testmaterial.s3.eu-central-1.amazonaws.com/samples/I_Am_Legend_-_Trailer.mxf"
}
In the case of using a local file, the URL would look something like this instead:
{
  "type": "VIDEO",
  "url": "file:///media/I_Am_Legend_-_Trailer.mxf"
}
Here /media/I_Am_Legend_-_Trailer.mxf is the absolute path to the file mounted on the JIT server.
You can also load additional audio files alongside the video file:
{
  "type": "AUDIO",
  "url": "https://example.com/audio.wav"
}
Step 3: Configure settings
Activate JIT playback by adding this settings block:
{
  "jit": {
    "iceServers": [
      {
        "urls": [
          "stun:stun.l.google.com:19302",
          "stun:stun1.l.google.com:19302",
          "stun:stun2.l.google.com:19302",
          "stun:stun3.l.google.com:19302",
          "stun:stun4.l.google.com:19302"
        ]
      }
    ],
    "backendUrl": "http://localhost:8080",
    "enabled": "always"
  }
}
The backendUrl points to the JIT Backend setup in step 1, and in this example we use public STUN servers from google. You can read more about the settings here.
Override default track layout
Some files — especially those prepared for editing — are split into individual mono tracks for each channel. This makes it easier to edit channels independently, but it’s not how you would typically play back the audio.
For example, if a file contains six (6) mono tracks, you might want to play them back as a single 5.1 surround track, or perhaps as 3 stereo tracks. The JIT might not always infer the intended playback layout correctly. In such cases, you can explicitly define how the channels should be grouped by specifying the audioStreams inside the container:
{
  "type": "AUDIO",
  "url": "https://example.com/test.mxf",
  "container": {
    "audioStreams": [
      {
        "channels": 6,
        "channelLayout": ["FL", "FR", "FC", "LFE", "SL", "SR"]
      }
    ]
  }
}
{
  "type": "AUDIO",
  "url": "https://example.com/test.mxf",
  "container": {
    "audioStreams": [
      {
        "channels": 2,
        "channelLayout": ["FL", "FR"]
      },
      {
        "channels": 2,
        "channelLayout": ["FL", "FR"]
      },
      {
        "channels": 2,
        "channelLayout": ["FL", "FR"]
      }
    ]
  }
}
The channels are mapped from their original (global) channel index in the file to the order you define in audioStreams.
In the second example above:
- Channels 0 & 1 form the first stereo track
- Channels 2 & 3 form the second stereo track
- Channels 4 & 5 form the third stereo track
The channelLayout defines how channels are mixed during playback. If channelLayout is omitted, Validate will attempt to infer a suitable layout automatically based on the channelCount.
See Audio stream object for full details.
Cantemo & Vidispine
When running Validate with Cantemo and/or Vidispine, you cannot override the container directly as shown in the LTA examples above.
Instead, you can attach metadata (key-value metadata) to the file (Shape in Vidispine) using the key av:containerOverride. The value should be a JSON object (encoded as a string) containing the container information you want to override.
When this metadata field is present, Validate will merge the override with the default container, allowing you to redefine the track layout in the same way as described above.
{
  "key": "av:containerOverride",
  "value": "{\"audioStreams\":[{\"channels\":2,\"channelLayout\":[\"FL\",\"FR\"]}]}"
}
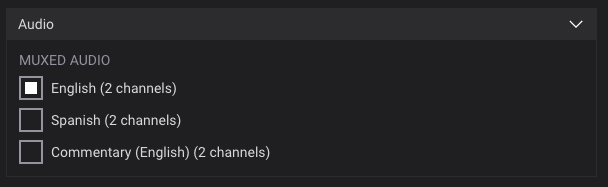
Custom labels
You can customize how the audio track labels are displayed in Validate by setting audioFileDisplay:
{
  "settings": {
    "audioFileDisplay": "%metadata:label (%channels channels)"
  }
}
To set metadata on the individual tracks within the video/audio file you can specify them as metadata on the audioStreams object in the container, like so:
{
  "type": "AUDIO",
  "url": "https://example.com/test.m4a",
  "container": {
    "audioStreams": [
      {
        "metadata": [
          {
            "key": "label",
            "value": "English"
          }
        ]
      },
      {
        "metadata": [
          {
            "key": "label",
            "value": "Spanish"
          }
        ]
      },
      {
        "metadata": [
          {
            "key": "label",
            "value": "Commentary (English)"
          }
        ]
      }
    ]
  }
}
Now you'll see the custom label in Validate on the audio track:
Automatic quality
During playback the player will adjust the quality automatically based on your connection. When the player is paused, the backend server will send a higher resolution image.
Limitations
While JIT playback makes it possible to play more formats, it comes with limitations. For Validate this means that some features are disabled.